
At GOMANTIUM we specialize in glazing trim for windows and glass. If you’re looking for windshield seals, classic car profiles, or window channels and belt weatherstrips (scrapers), here’s a practical guide to choosing correctly, measuring without mistakes, and installing like a pro.

What we mean by glazing trim for windows and glass
A set of profiles, seals, and guides that seal, guide, or finish the junction between the glass and the bodywork or frame: windshield, rear window, sliding/hinged windows, and doors. The most common materials are EPDM (high UV/ozone resistance), PVC, and textile felt for guides.
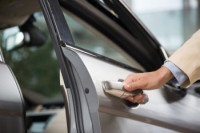
1) Windshield seals
They seal the glass perimeter and absorb small expansions. They can be a single-profile seal or incorporate a locking strip, often with a chrome finish on classics.
How to choose the right seal
- Glass thickness: measure with calipers (typical: 4–6 mm). The profile channel must grip this thickness without play.
- Mounting type: with locking strip (rubber-mounted windshield) or for bonded installations (urethane) when the glass is glued in.
- Profile section: shape of the inner/outer lips and depth of the body channel.
- Finish: satin black, with chrome locking strip or black.
Summary installation (rubber-mounted windshield)
- Clean and degrease the channel and edge of the bodywork.
- Fit the seal onto the glass and place a cord in the inner channel.
- Seat the assembly from the bottom and pull the cord inward so the lip pops over the edge.
- Apply a sealant compatible with EPDM if required by the manufacturer and install the locking strip.

2) Classic car profiles
Classics use specific profiles (U, T, H, double-lip) and decorative locking strips that aren’t used on modern vehicles. At GOMANTIUM we supply sizes by the meter and faithful reproductions for restoration.
Keys to getting restoration right
- Replicate the original profile: bring a sample or photos with a ruler. Match the cross-section, Shore hardness, and lip shape.
- Respect radii and corners: avoid stretching; use miter cuts and place joints at the lower edge.
- Aesthetic compatibility: choose chrome/black locking strip to match the original finish.

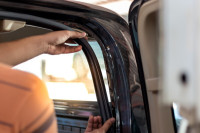
3) Window channels and belt weatherstrips
The window channel (felt-lined) centers the glass and eliminates vibration. The belt weatherstrip (scraper—outer and inner) wipes away water and dirt as the window moves.
Selection and measurement
- Glass width: common thickness is 3–5 mm (industrial up to 8–10 mm). Choose the guide whose usable channel matches.
- Guide type: straight, curved, open/closed, with or without fixing tabs.
- Belt weatherstrip: single or double lip; with metal spine for clipping or adhesive-backed.
Fitting and maintenance
- Install the guide without stretching; test-fit and trim at the end.
- Lightly lubricate with silicone spray for the first up/down cycle.
- Inspect every 12 months: worn felt = scratches and play in the glass.

Quick table: recommended material by use
| Application | Recommended material | Notes |
|---|---|---|
| Rubber-mounted windshield/rear window | EPDM + locking strip | High UV/ozone resistance; add sealant if required |
| Sliding window | Felt-lined guide | Select channel according to glass thickness |
| Outer/inner belt weatherstrip | EPDM with metal spine or adhesive | Single/double lip depending on water exposure |
| Classic restoration | Specific EPDM profile + locking strip | Prioritize equivalent cross-section and Shore hardness |
Common mistakes (and how to avoid them)
- Choosing an “oversized” channel out of caution: causes float and leaks. Measure the glass.
- Installing with the profile stretched: over time it shrinks and gaps open up.
- Using harsh solvents: they dry out EPDM. Use isopropyl alcohol.
- Forgetting drainage: check that doors and frames have water outlets.
Need help?
At GOMANTIUM we’ll help you find the exact windshield seal, classic profile, or window channel/belt weatherstrip for your project. We supply by the meter and in ready-to-install kits.

6 Comments
Guide To Best Robot Vacuum Uk: The Intermediate Guide For Best Robot Vacuum Uk Best Robot Vacuum Uk
5 Automatic Vacuum Cleaner Uk Projects For Every Budget best Robot vacuum cleaner Uk
15 Best Louisiana Asbestos Lawyer Bloggers You Need To Follow best louisiana Asbestos Lawyer (md.entropia.de)
The 12 Best Purchase Goethe B1 Online Accounts To Follow On Twitter goethe b1 deutsch Online zertifikat Kaufen
Who\'s The Top Expert In The World On Bunk Bed For Teens?Bunk beds for teens
5 Killer Quora Answers To Nespresso Café nespresso café